When can babies eat beans?
If cooked to soft, beans can be offered to babies as soon as they’re ready to start solids, usually around 6 months. It’s important to remember that your baby is unique and that rather than going by the calendar, you need to make sure your baby is DEVELOPMENTALLY ready to start solids. If you’re unsure, be sure to grab my FREE handout!
Health Benefits
Beans are classified as a legume (also called pulses), along with peanuts, peas, and lentils. This is a family that packs a powerful punch when it comes to nutrition. Beans are SO great for babies! They are loaded with the essential nutrients babies need to grow and thrive, including iron, zinc, folate, protein, carbohydrates, and fiber. Be sure to pair them with vitamin C rich foods to greatly enhance the absorption of iron! And while colorful fruits and vegetables are considered to be the best source of phytonutrients, beans are also a great source for these antioxidant, anti-inflammatory, and other health-promoting compounds.
Do beans make babies gassy?
Foods that are rich in fiber tend to cause gas. This list includes beans, cruciferous vegetables, oatmeal, prunes, peaches, and pears. There’s no need to avoid these foods completely as they offer so many beneficial nutrients that are essnetial for proper growth and development. Not to mention, early introduction to a wide variety of flavors and textures is key in minimizing picky eating down the road. Start by offering a small amount (1-2 tablespoons) and gradually serve more. If your baby becomes gassy but doesn’t seem to be in discomfort, there’s no reason to worry. If your baby gets extra gassy after eating a certain bean, just don’t overload them with those foods. You can also try different varieties as your baby may do better with certain beans than others. For instance, my baby did well with all the beans that were served except for black beans. But after about 3 exposures, she seemed to tolerate just fine.
Are beans safe for babies?
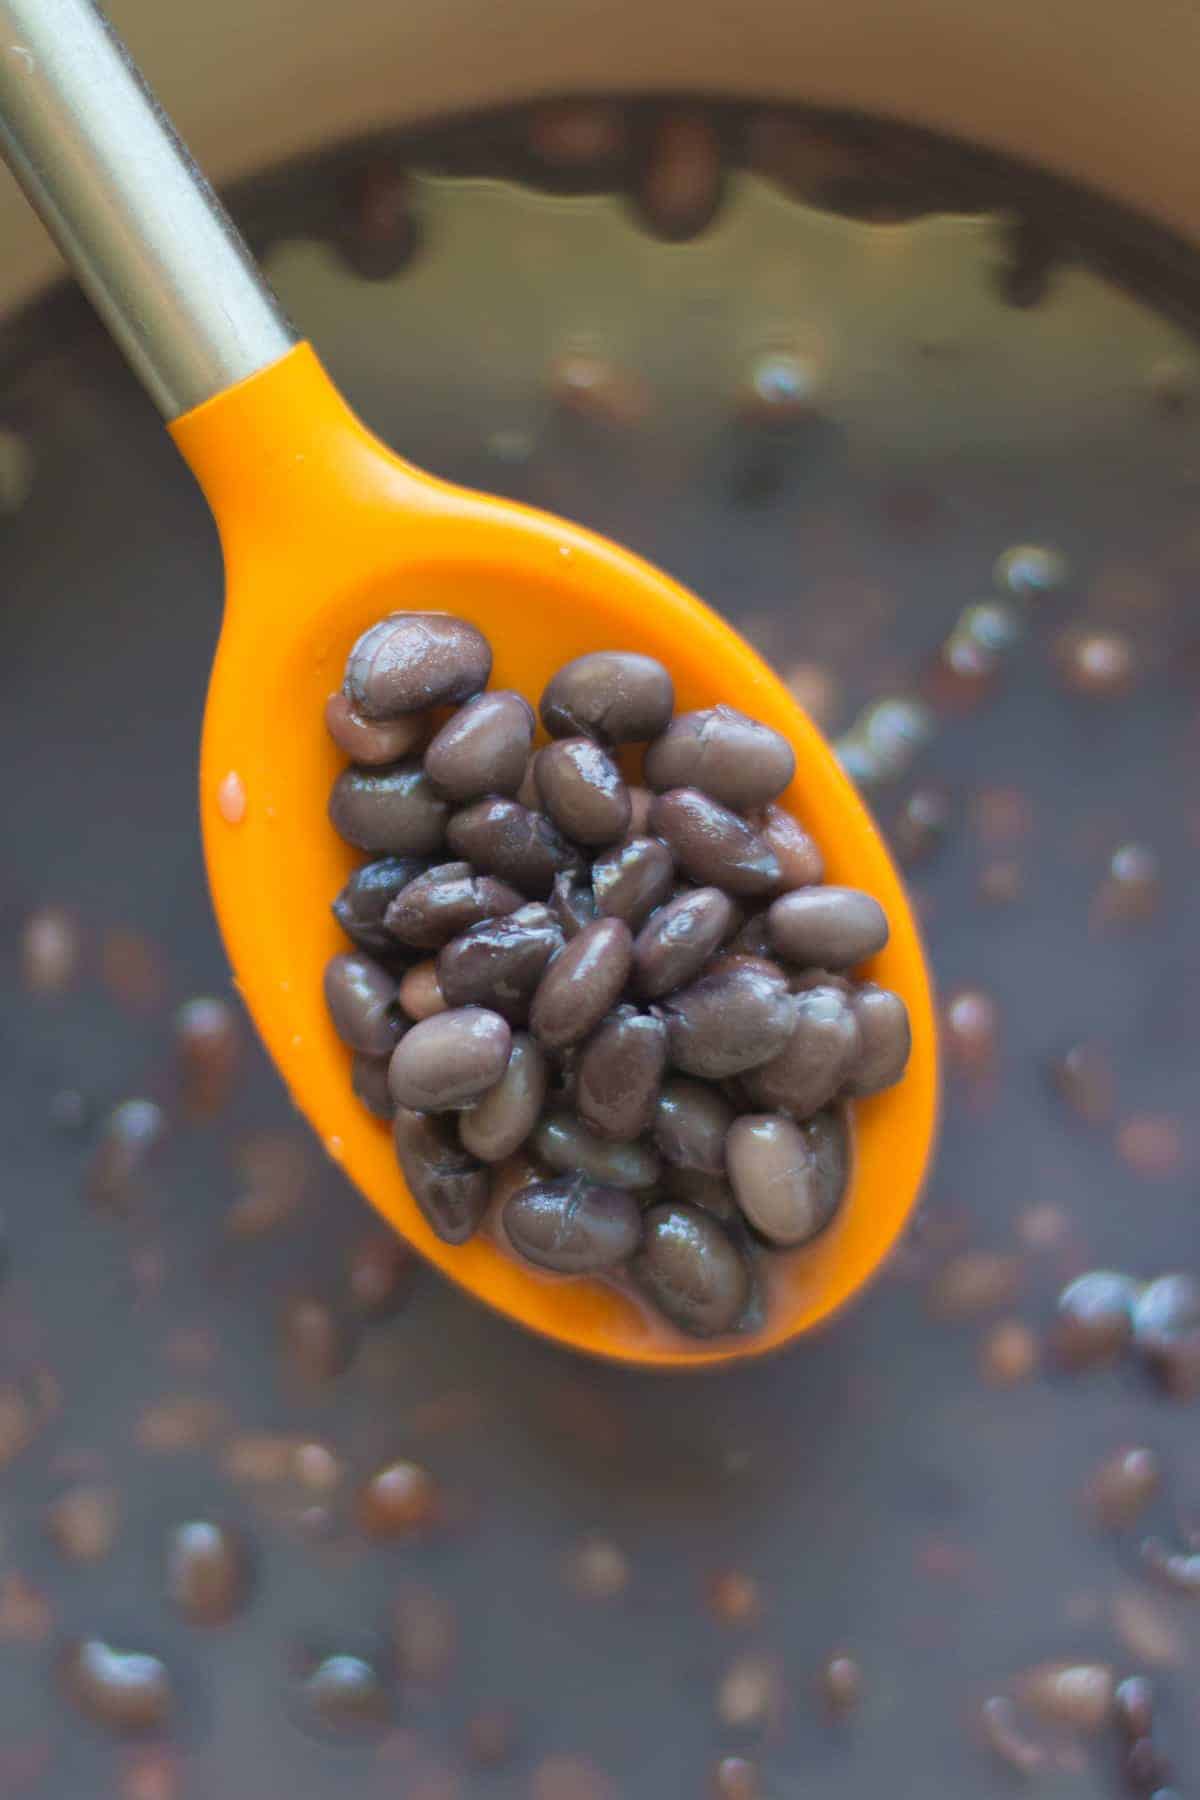
Depending on the size and shape, beans can pose a choking risk. To reduce the risk, smash/flatten them, removing any skin that comes off. And follow the age-based serving suggestions shared below. If you’re cooking the beans rather than using canned, make sure they are soft and easily smushed between your thumb and forefinger. It’s also very important that you ALWAYS serve food at the table where your baby is sitting upright at a 90 degree angle. Even foods that aren’t considered to choking hazards can be dangerous if given while baby is lying down, crawling, walking, etc. In regards to allergies, soybeans are one of the top allergens so be sure to introduce them separately. While it’s not impossible, an allergy to the rest of the beans is rare. What to do when baby won’t eat
Types of Beans- which one is best?
Did you know that there are nearly 400 types of beans?! Here are the most common ones that you’re likely to find at the stores.
Black Beans Black eyed peas Cannellini beans (or white Italian kidney beans) Edamame Garbanzo beans (chickpeas) Great Northern Beans Kidney beans Pinto beans
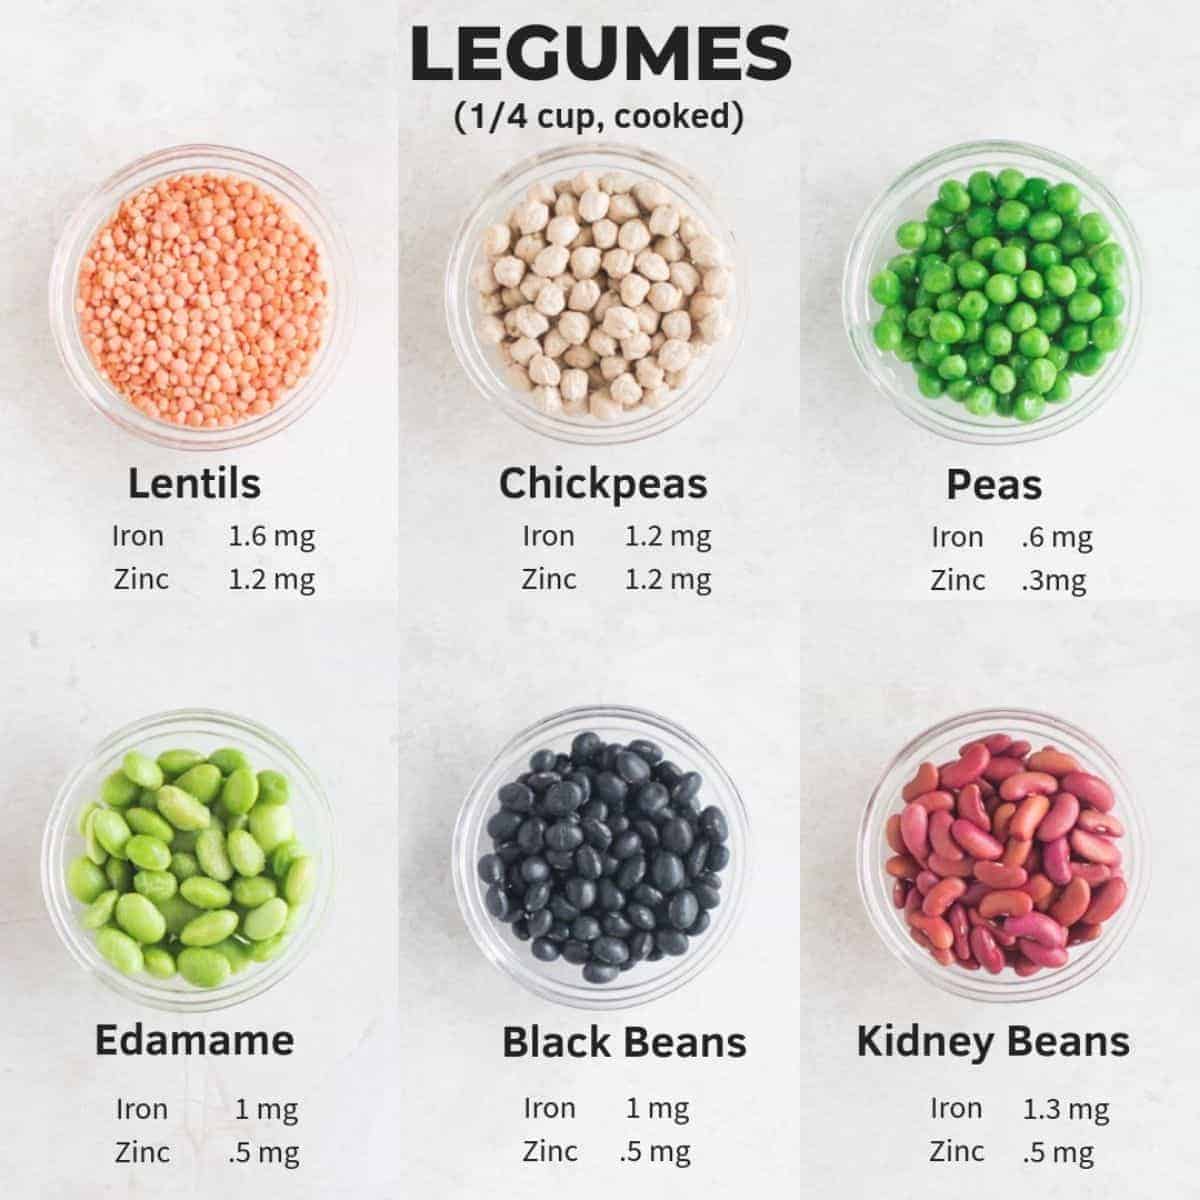
ALL beans are fantastic for babies. I highlighted the two essential nutrients during the first year in the chart above, and as you can see, they are pretty similar in their nutritional profile. VARIETY is always best so give some love to as many beans as you can ;).
But what about the antinutrients?
It’s true that legumes contain antinutrients, such as phytic acid, lectins, saponins, and tannins, that reduce the absorption of certain nutrients, including iron, zinc, and calcium. However, many other healthy foods, like grains, leafy greens, nuts, and seeds all contain antinutrients. So does this mean we should limit or avoid them? Of course not. Instead, always aim for variety and balance! Unless beans are all you are serving to your baby, the benefits outweigh the risks of consuming antinutrients. Not to mention soaking and cooking will decrease the amount of antinutrients significantly. All this to say, DON’T WORRY!
Soaking Beans
While it’s an extra step, I highly recommend soaking. It will not only decrease cooking time but will also help the beans cook more evenly and make them easier to digest. The beans will expand upon soaking so be sure to take this into account when choosing the size of the bowl.
Overnight soaking
Place dried beans in a large bowl, cover with water by 2 inches, discard any that float, and soak on the counter, covered, for at least 4 hours or overnight. If soaking for more than 8 hours, transfer to the refrigerator. Drain and rinse before using.
Quick soaking
On the stove- Add beans to a pot and cover with water by 2 inches. Bring to a boil. Remove from heat and let soak for an hour. Drain and rinse before cooking.
Cooking Methods
Besides being nutrient dense, beans are inexpensive and last a long time in the pantry (hallelujah!). Regardless of which method you choose, be sure to:
Sort through the beans to remove any debris or shriveled beans. Rinse under running cold water to remove any surface dust or dirt
Cooking times will vary depending on the variety, age of the beans, and even the type of water you use. If your water has a lot of calcium, it can increase the time. I’ve provided approximate cooking times. I encourage you to start checking for doneness at the beginning of the time range and then every 15 minutes thereafter. Be sure to jot down the final cooking times somewhere for future reference.
On the Stove
Low and steady for best results! Add more water as needed so that the beans stay submerged. It will generally take about 1-2 hours to cook. Start checking for doneness after an hour.
Slow Cooker
Cover beans with 2 inches of water. Set to low and cook for 6-8 hours. Note – Kidney beans in particular contain a large amount of a toxin called phytohaemagglutinin (or kidney bean lectins) that doesn’t get destroyed when cooked in the slow cooker. That’s because the temperature never gets hot enough. Therefore, be sure to soak and then boil for at least 10 minutes before adding to the slow cooker.
Instant Pot
Add beans to Instant pot and cover with water to about 2 inches above the beans. Stir, close the lid, and cook on high pressure for 8-15 minutes. Allow pressure to release naturally for 15 minutes. Here are the cooking times for the beans I cook most often:
Black beans: 8-10 minutes Cannellini: 8-10 minutes Chickpeas: 13-15 minutes
Canned Beans
While dried beans are less expensive, canned ones are so convenient and great time-savers since they are fully cooked. They are just as nutritious as the dried beans. I used to cook them all the time, but now that I’m a mom of two, I will take all the help I can get! Be sure to look for ones that are labeled “no salt added” or “low sodium” and that come with non-BPA lining. Rinsing them in running water can lower the sodium content even more.
How to Serve Beans to Babies (Baby Led Weaning)
I could do a whole post on this as beans go well with so many different foods and flavors! Here are some EASY and nutritious ways to add them into your baby’s diet.
6-9 months old:
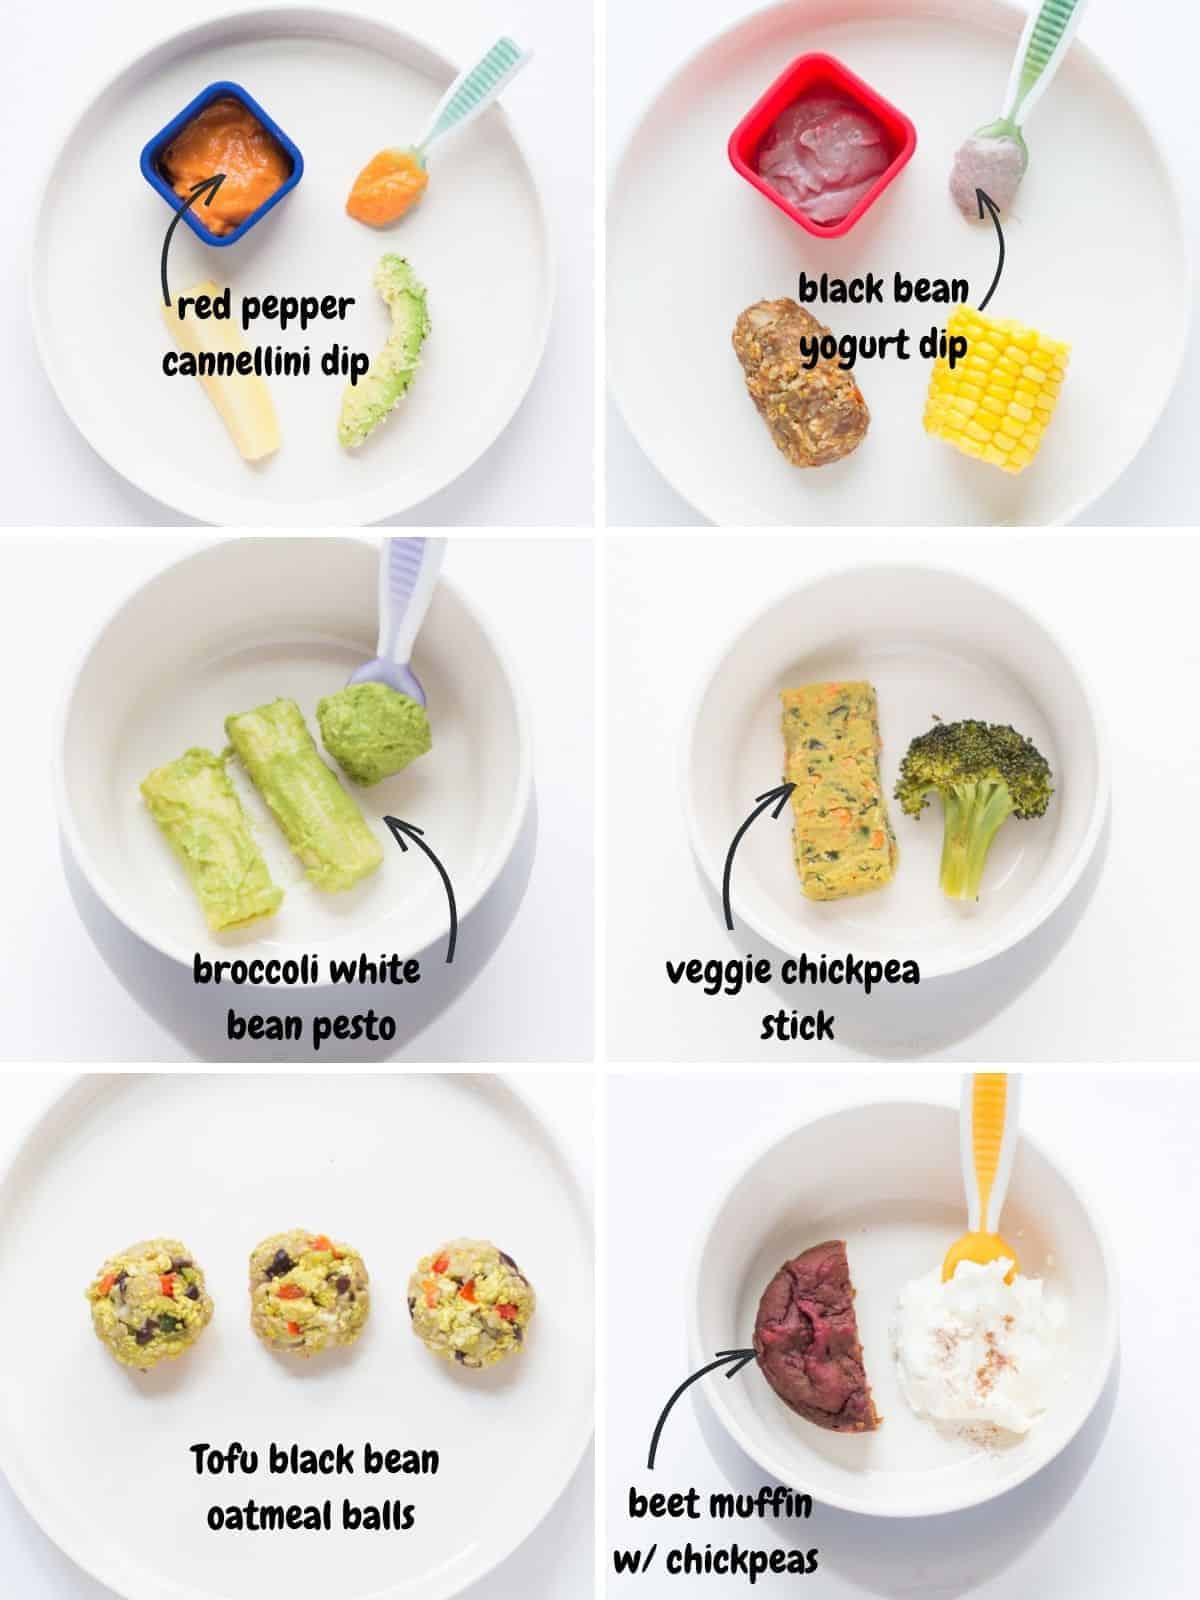
You can try serving whole beans. Just be sure to flatten using your fingers or the back of a fork, removing any loose skin in the process. But if this makes you uncomfortable, don’t do it! I am a big believer in know all things and then follow your heart. You can also puree/blend or mash. The consistency is pretty thick and dry so add some breastmilk/formula to thin it out. And here are some fun and EASY ways to boost nutrition and introduce your baby to a ton of flavors and texture in one bite. Add beans to:
Yogurt Avocado Mashed sweet potatoes Mashed butternut squash Oatmeal – follow the recipe and then add the beans once cooked Lentils Hummus/Dip (recipes linked below)
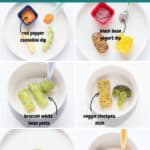
Pictured above are the exact meals I served to my baby during her first month of starting solids. I actually filmed EVERYTHING I made for her as well as my toddler, husband, and me from Day 1 to Day 84 (so 3 months) in real time and turned it into an easy to access and follow program!
9+ months old:
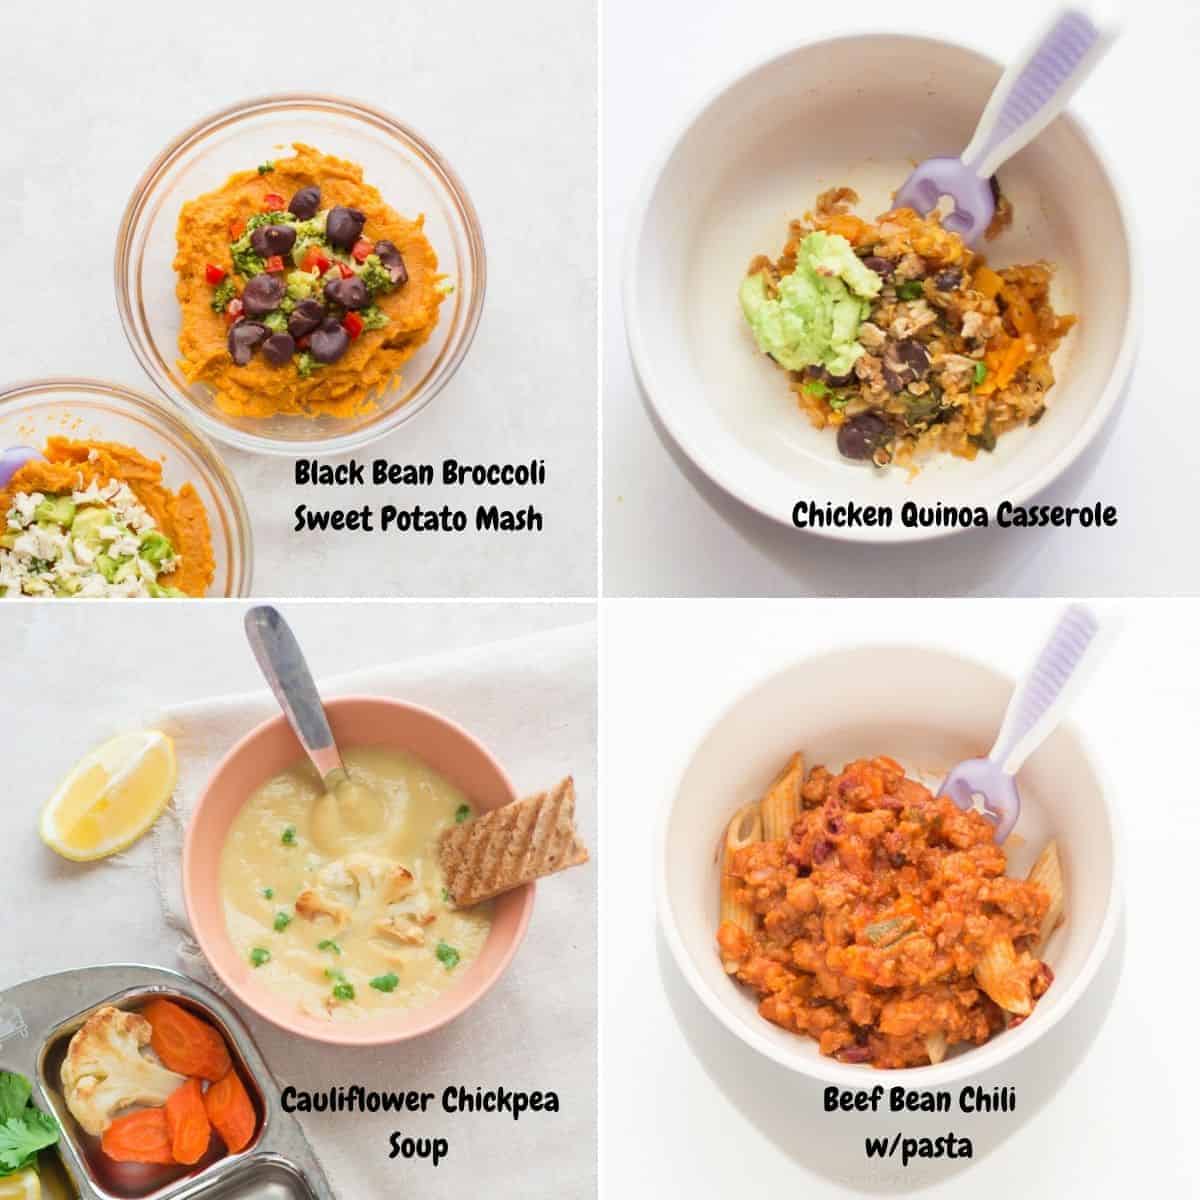
I encourage you to continue offering mixed foods before your baby becomes more selective. If they’ve never had foods touching and mixed together, it will be much harder to get them to eat these later on. I’ve included plenty of family-friendly meals to help get you started! Continue to flatten chickpeas and all other round varieties. If you haven’t already, this is a good time to introduce utensils (linked our favorites).
12+ months old:
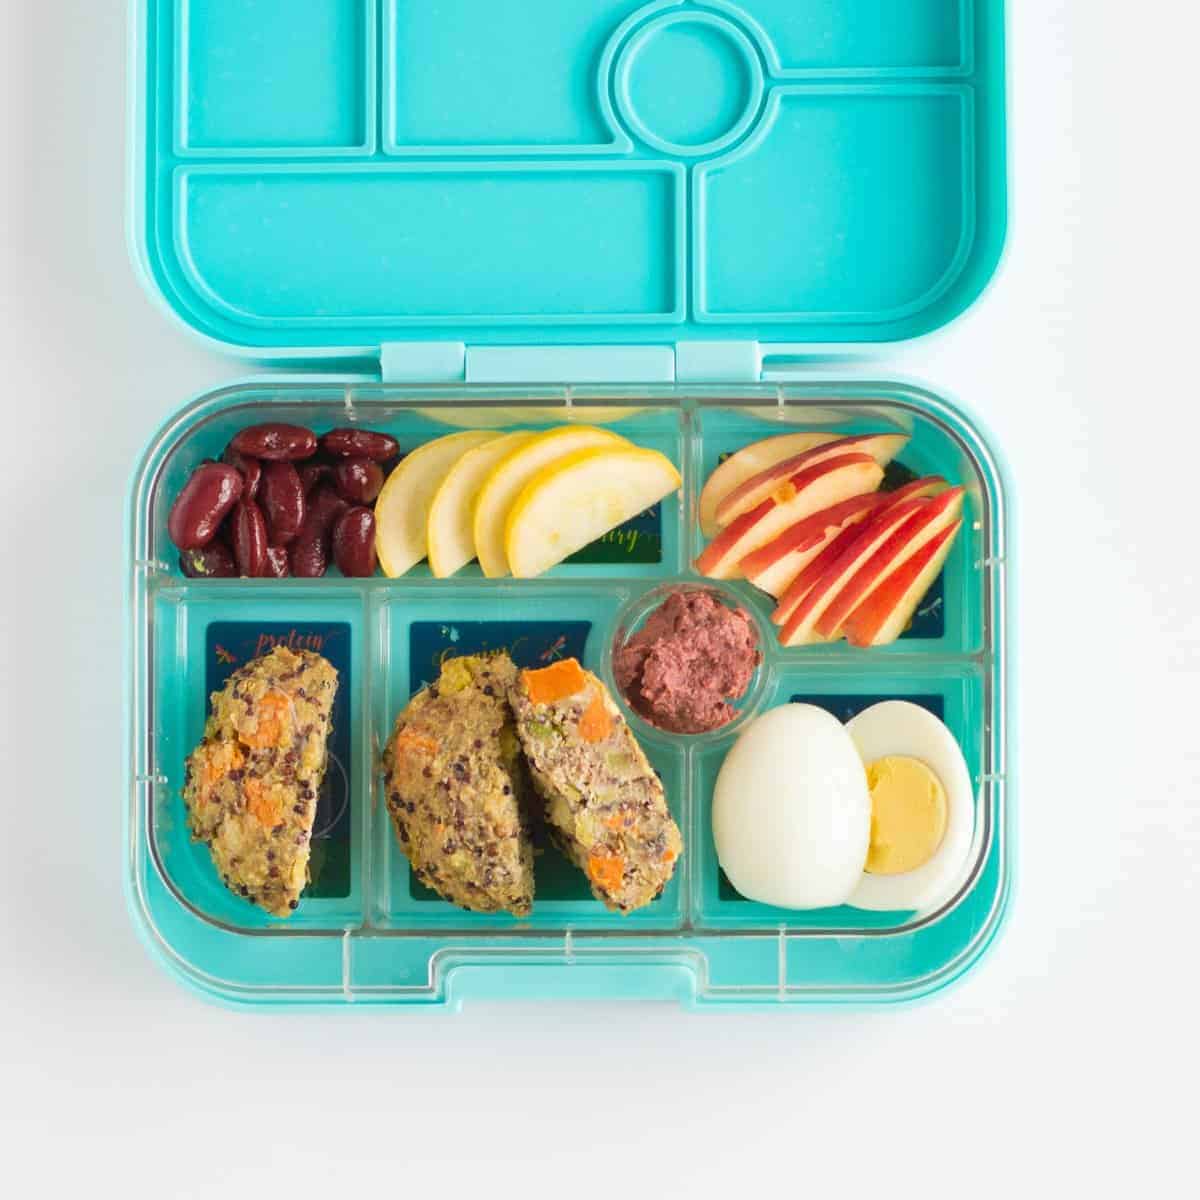
Anything goes at this age! My personal favorite is adding whole beans to my son’s school lunch boxes. SOO easy and convenient.
Bean Recipes for Babies and Toddlers
Dips/ Sauce
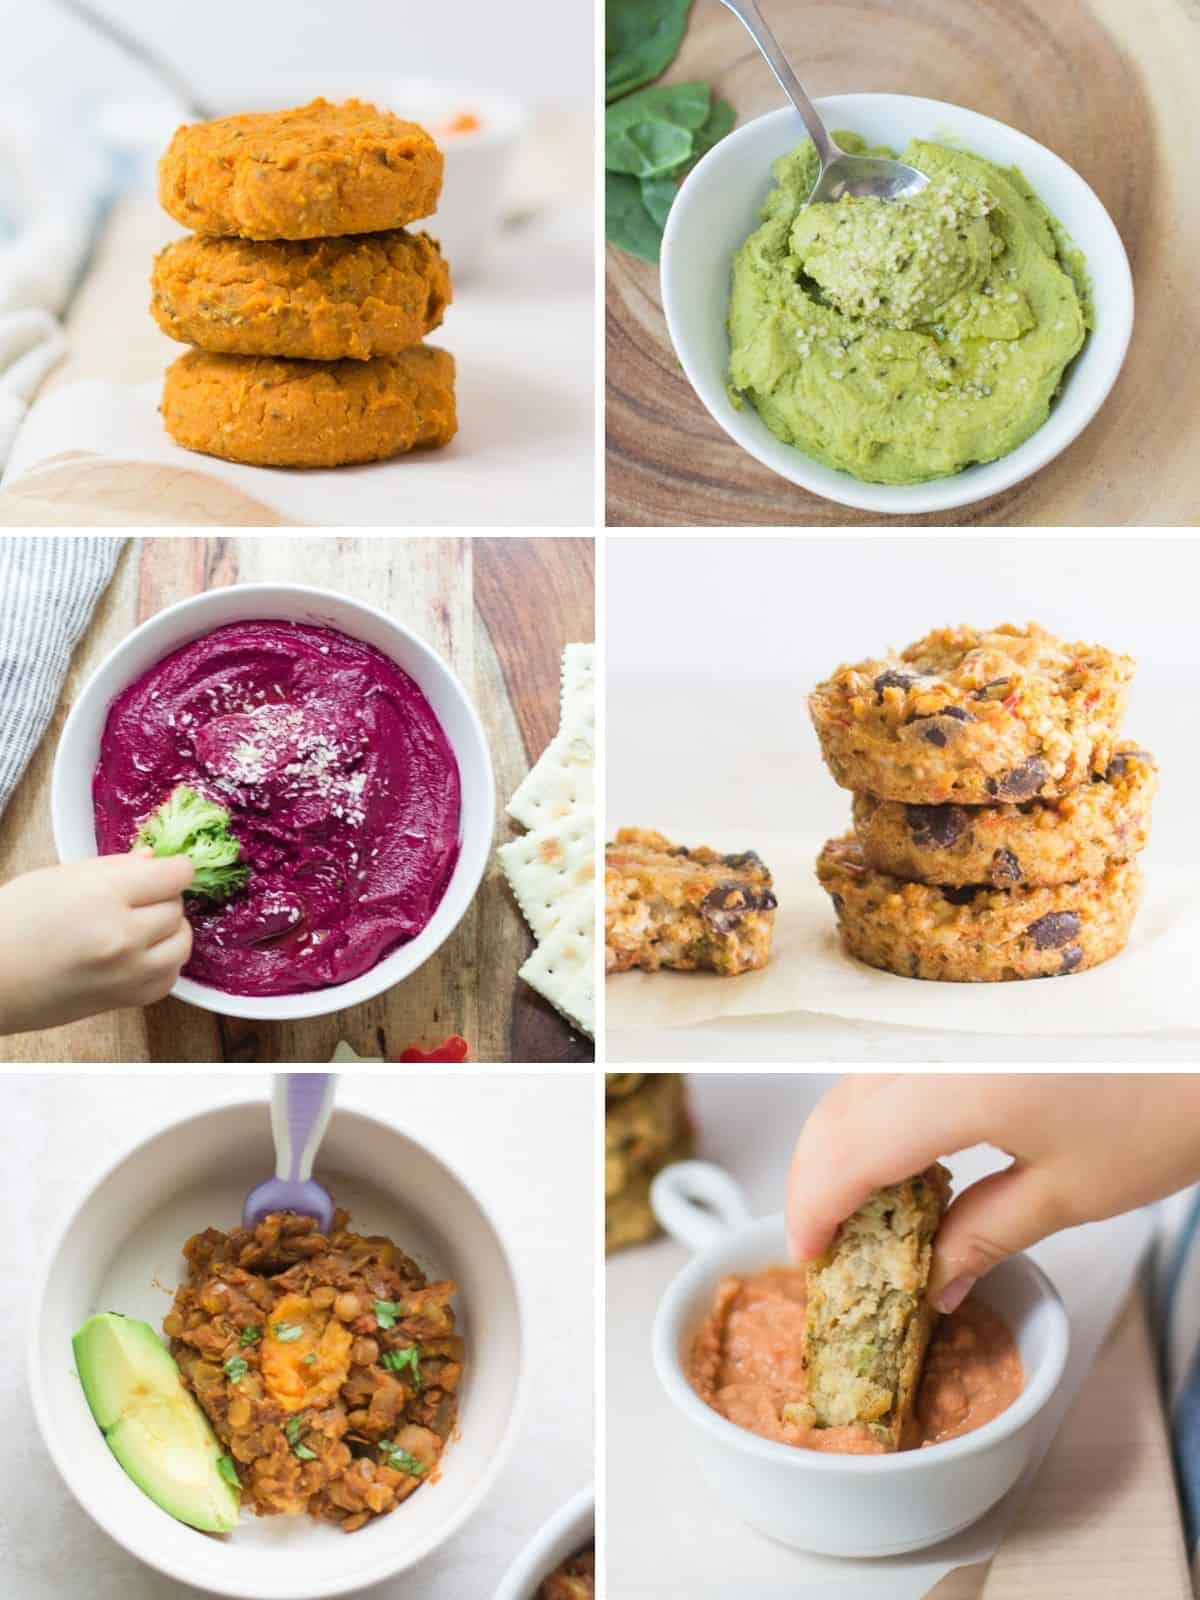
Broccoli Hummus Beet Hummus Yogurt Black Bean Dip Beetroot Dip Pumpkin seed spinach hummus Nut -Free Broccoli White Bean Pesto
Finger Foods
Chickpea Veggie Cakes Beet Muffins Pumpkin Banana Muffins Mexican Lentil Muffins Sweet Potato Chickpea Cookies Southwestern Oat Muffins
Lunch/Dinner
Pizza Quesadilla with vegetables Chicken Quinoa Casserole Cauliflower Chickpea Soup Salmon Bean Salad Vegan Creamy Tomato Pasta Slow Cooker Lentil Chili Vegetarian Mexican Lentils African Peanut Stew Instant Pot Multigrain Rice
How to Store Cooked Beans
In the refrigerator
You can transfer to an airtight container/jar with or without the cooking water. I’ve found that storing along with the liquid prevents the skins from drying out, but it’s really up to you. If you intend to use for soup, the liquid also adds a nice yum factor. Refrigerate for up to 5 days.
In the freezer
I recommend freezing in 1 1/2 cup portions. A lot of recipes call for a 15 ounce can, which is roughly around 1 1/2 cups. If freezing with the cooking liquid, be sure to leave about 1 inch at the top for expansion. Freeze for up to 3 months. If freezing with the cooking liquid, be sure to leave about 1 inch at the top for expansion. Did you make this recipe? Leave a rating below and let me know how you liked the recipe! Your feedback means so much to me!