Pumpkin Banana Bread
Can’t decide between pumpkin bread and banana bread? Well, then you’ve gotta try making this healthy pumpkin banana bread! It’s the best of both worlds with all those cozy fall flavors in every single bite. You will also love how easy it is to whip up with simple ingredients you probably already have on hand! This quick bread is made with whole grains and no refined sugars and stays incredibly moist thanks to the dynamic pumpkin and banana combo. The banana isn’t too overpowering, rather it gives just that perfect hint of sweetness! Enjoy as a delicious breakfast or snack with this healthy cream cheese frosting or nut butter to add some protein. Perfect for sharing with kids. And if you’re looking for a similar muffin version, try these pumpkin banana muffins as well! This cranberry banana bread is so perfect for the holiday season too!
Ingredients
I am highlighting just the ones that need further explanation. The complete list is in the recipe card below.
Oats – Rolled oats work best but you can also use quick-cooking oats. Pumpkin – be sure to use canned pumpkin puree, NOT pumpkin pie filling! It’s a pantry staple as it’s a great source of vitamin A and fiber. If it’s not available, here’s how to make homemade pumpkin puree. Ripe bananas – the more ripe they are, the sweeter and more moist the bread will be. If you’re not planning to add maple syrup then be sure to use overripe bananas. Pumpkin pie spice – make your own or grab it from the store. Apple cider vinegar – Both oats and pumpkin can weigh the bread down. This will help make the bread less dense. You won’t be even taste it! Vanilla extract – be sure to get pure vanilla extract not imitation. Maple syrup – If planning to enjoy with your baby, leave it out completely as it’s recommended to avoid added sugars until 2. You can also use date syrup instead.
Substitutions
Egg-free? You can substitute with flax eggs. In a bowl, combine 2 tablespoons of flaxseed meal (ground flaxseed) and 6 tablespoons of water. Allow the mixture to sit for 8-10 minutes until thickened like gel-like consistency. No oats? You can use all purpose flour, white whole wheat flour, a combination of 1 cup all purpose flour and 3/4 cup whole wheat flour, or 1:1 gluten free flour like this one. Almond flour will NOT work. Butter – you can substitute with melted coconut oil or avocado oil.
Step-by-Step Instructions
Want a Sweeter Pumpkin Banana Bread?
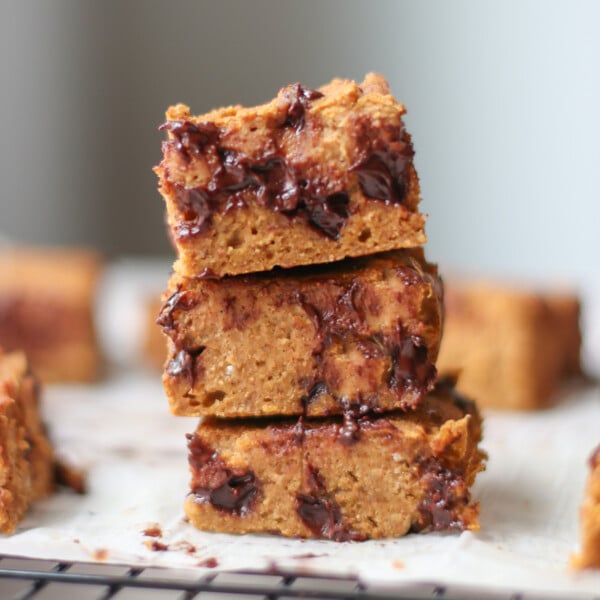
The natural sweetness in this recipe comes from bananas and maple syrup, which I’ve provided a range for the amount so you can decide how sweet you want the bread to be. Personally, I’ve found 3 tablespoons to be the sweet spot. But feel free to adjust the sweetness to your liking by adding more maple syrup. You can also add in some chocolate chips and/or dried fruits like chopped dates and raisins.
Favorite Mix-Ins for Low Sugar Pumpkin Bread
This bread is absolutely delicious as is but if you’d like to spice it up more, here are some add-ins to try:
Chopped walnuts, pecans, or pumpkin seeds. They are a great source of healthy fat and will add texture. Pumpkin seeds in particular is a great source of iron, a super important nutrient for babies and toddlers Chocolate chips Dried fruit – such as chopped dates, cranberries, or golden raisins
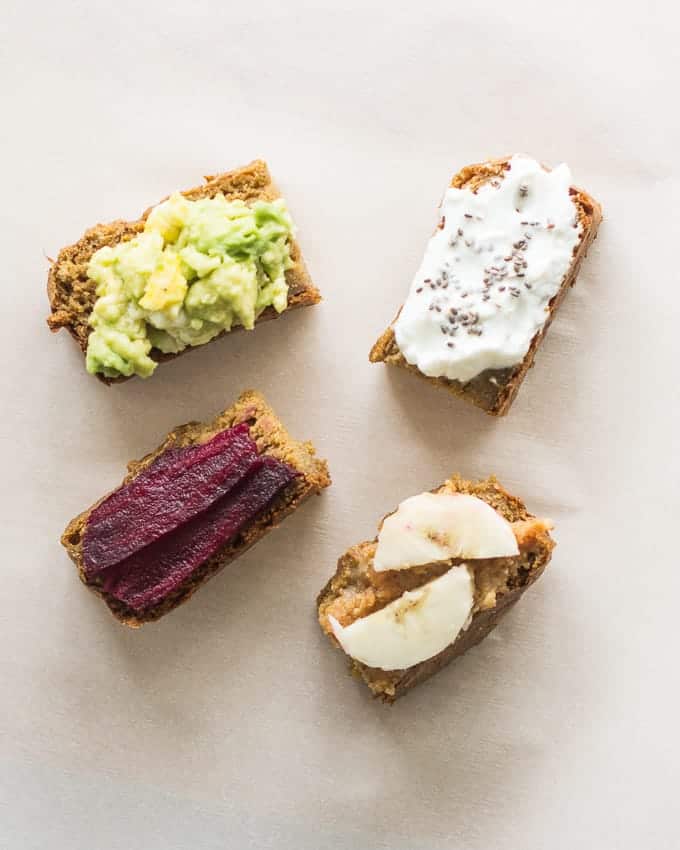
Pumpkin Bread for Baby
You can enjoy this pumpkin banana bread cold, at room temperature, or warmed up in the toaster oven. Although delicious as is, here are some suggestions to take the bread to the next level. If serving to your baby or toddler, any of these options are a great way to make every bite count!
Butter (fat is so important for optimal brain development) Cream cheese with chia seeds (or hemp or ground flax seeds) Yogurt Peanut butter (or any nut or seed butter, if there’s an allergy) with banana or berries Cooked vegetables – such as beets or sweet potatoes
Storage Suggestions
Once cooled, store in an airtight container for 1-2 days on the counter or in the refrigerator for up to 4 days. To freeze:
A whole loaf of bread – cool completely, wrap it in plastic wrap, and place in the freezer bag. Will keep for up to 3 months. Individual slices – Stack two to four slices, separating each with a small piece of waxed or parchment paper and wrap each stack in plastic wrap, and place in the freezer bag.
Did you make this recipe? Leave a rating below and let me know how you liked the recipe! Your feedback means so much to me!